Quick Start Guide
Follow this guide to quickly set up OpenChoreo in a local environment with Docker.
The setup uses a preconfigured Dev Container that includes all required dependencies for installation and cleanup.
Ensure the following before you begin:
- Docker (Engine 26.0+ recommended)
- Allocate at least 4 GB RAM and 2 CPUs.
- If you plan to install with WorkflowPlane, allocate 8 GB RAM and 4 CPUs for optimal performance.
- 5-10 minutes of setup time
If you encounter issues with Docker alternatives (Docker Desktop, Rancher Desktop, etc.), report them via GitHub.
For optimal compatibility and to avoid buildpack build issues, we recommend using Colima with VZ and Rosetta support.
colima start --vm-type=vz --vz-rosetta --cpu 4 --memory 8
Run the following command to start the dev container and open a terminal session within it:
docker run --rm -it --name openchoreo-quick-start \
  --pull always \
  -v /var/run/docker.sock:/var/run/docker.sock \
  --network=host \
  ghcr.io/openchoreo/quick-start:v1.0.0
Inside the container, run the installation command:
./install.sh --version v1.0.0
This command performs the following:
- Creates a local k3d (k3s-in-Docker) cluster
- Installs OpenChoreo and its dependencies using Helm charts
The installation script is idempotent. You can rerun it safely if the process is interrupted.
When installation completes successfully, you see a summary of component statuses:
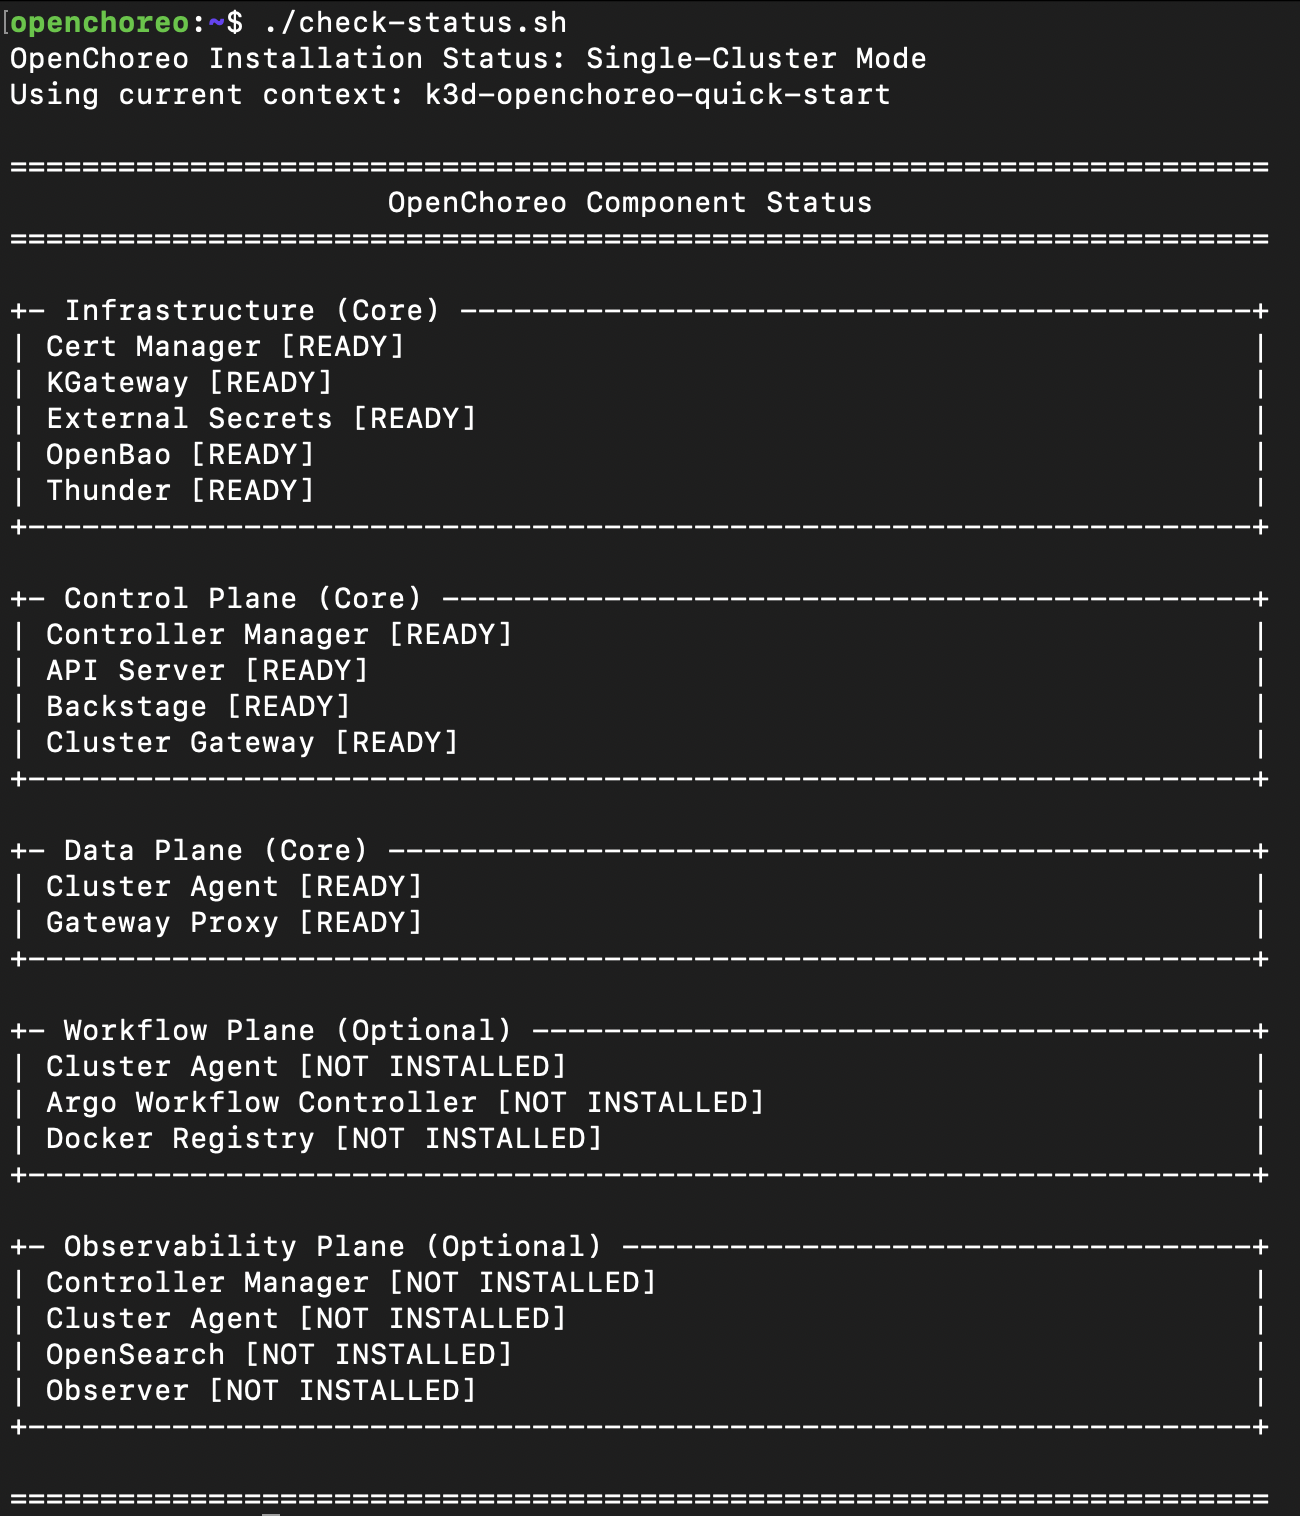
If any components remain in the pending state, wait a few minutes and run the following command to check their
status:
./check-status.sh
After setting up OpenChoreo in your Docker environment, deploy a sample web application by running:
./deploy-react-starter.sh
When deployment completes, the output includes a message with the application URL:
[SUCCESS] React Starter web application is ready!
🌍 Access the application at: http://react-starter-development-default.openchoreoapis.localhost:19080
Open this URL in your browser to see the React starter application.

[INFO] To clean up and delete this application, run:
[INFO] ./deploy-react-starter.sh --clean
Now that your web application is deployed, access the OpenChoreo Backstage UI to explore and manage your components:
Access the UI at: http://openchoreo.localhost:8080/
Default login credentials:
- Username:
admin@openchoreo.dev - Password:
Admin@123
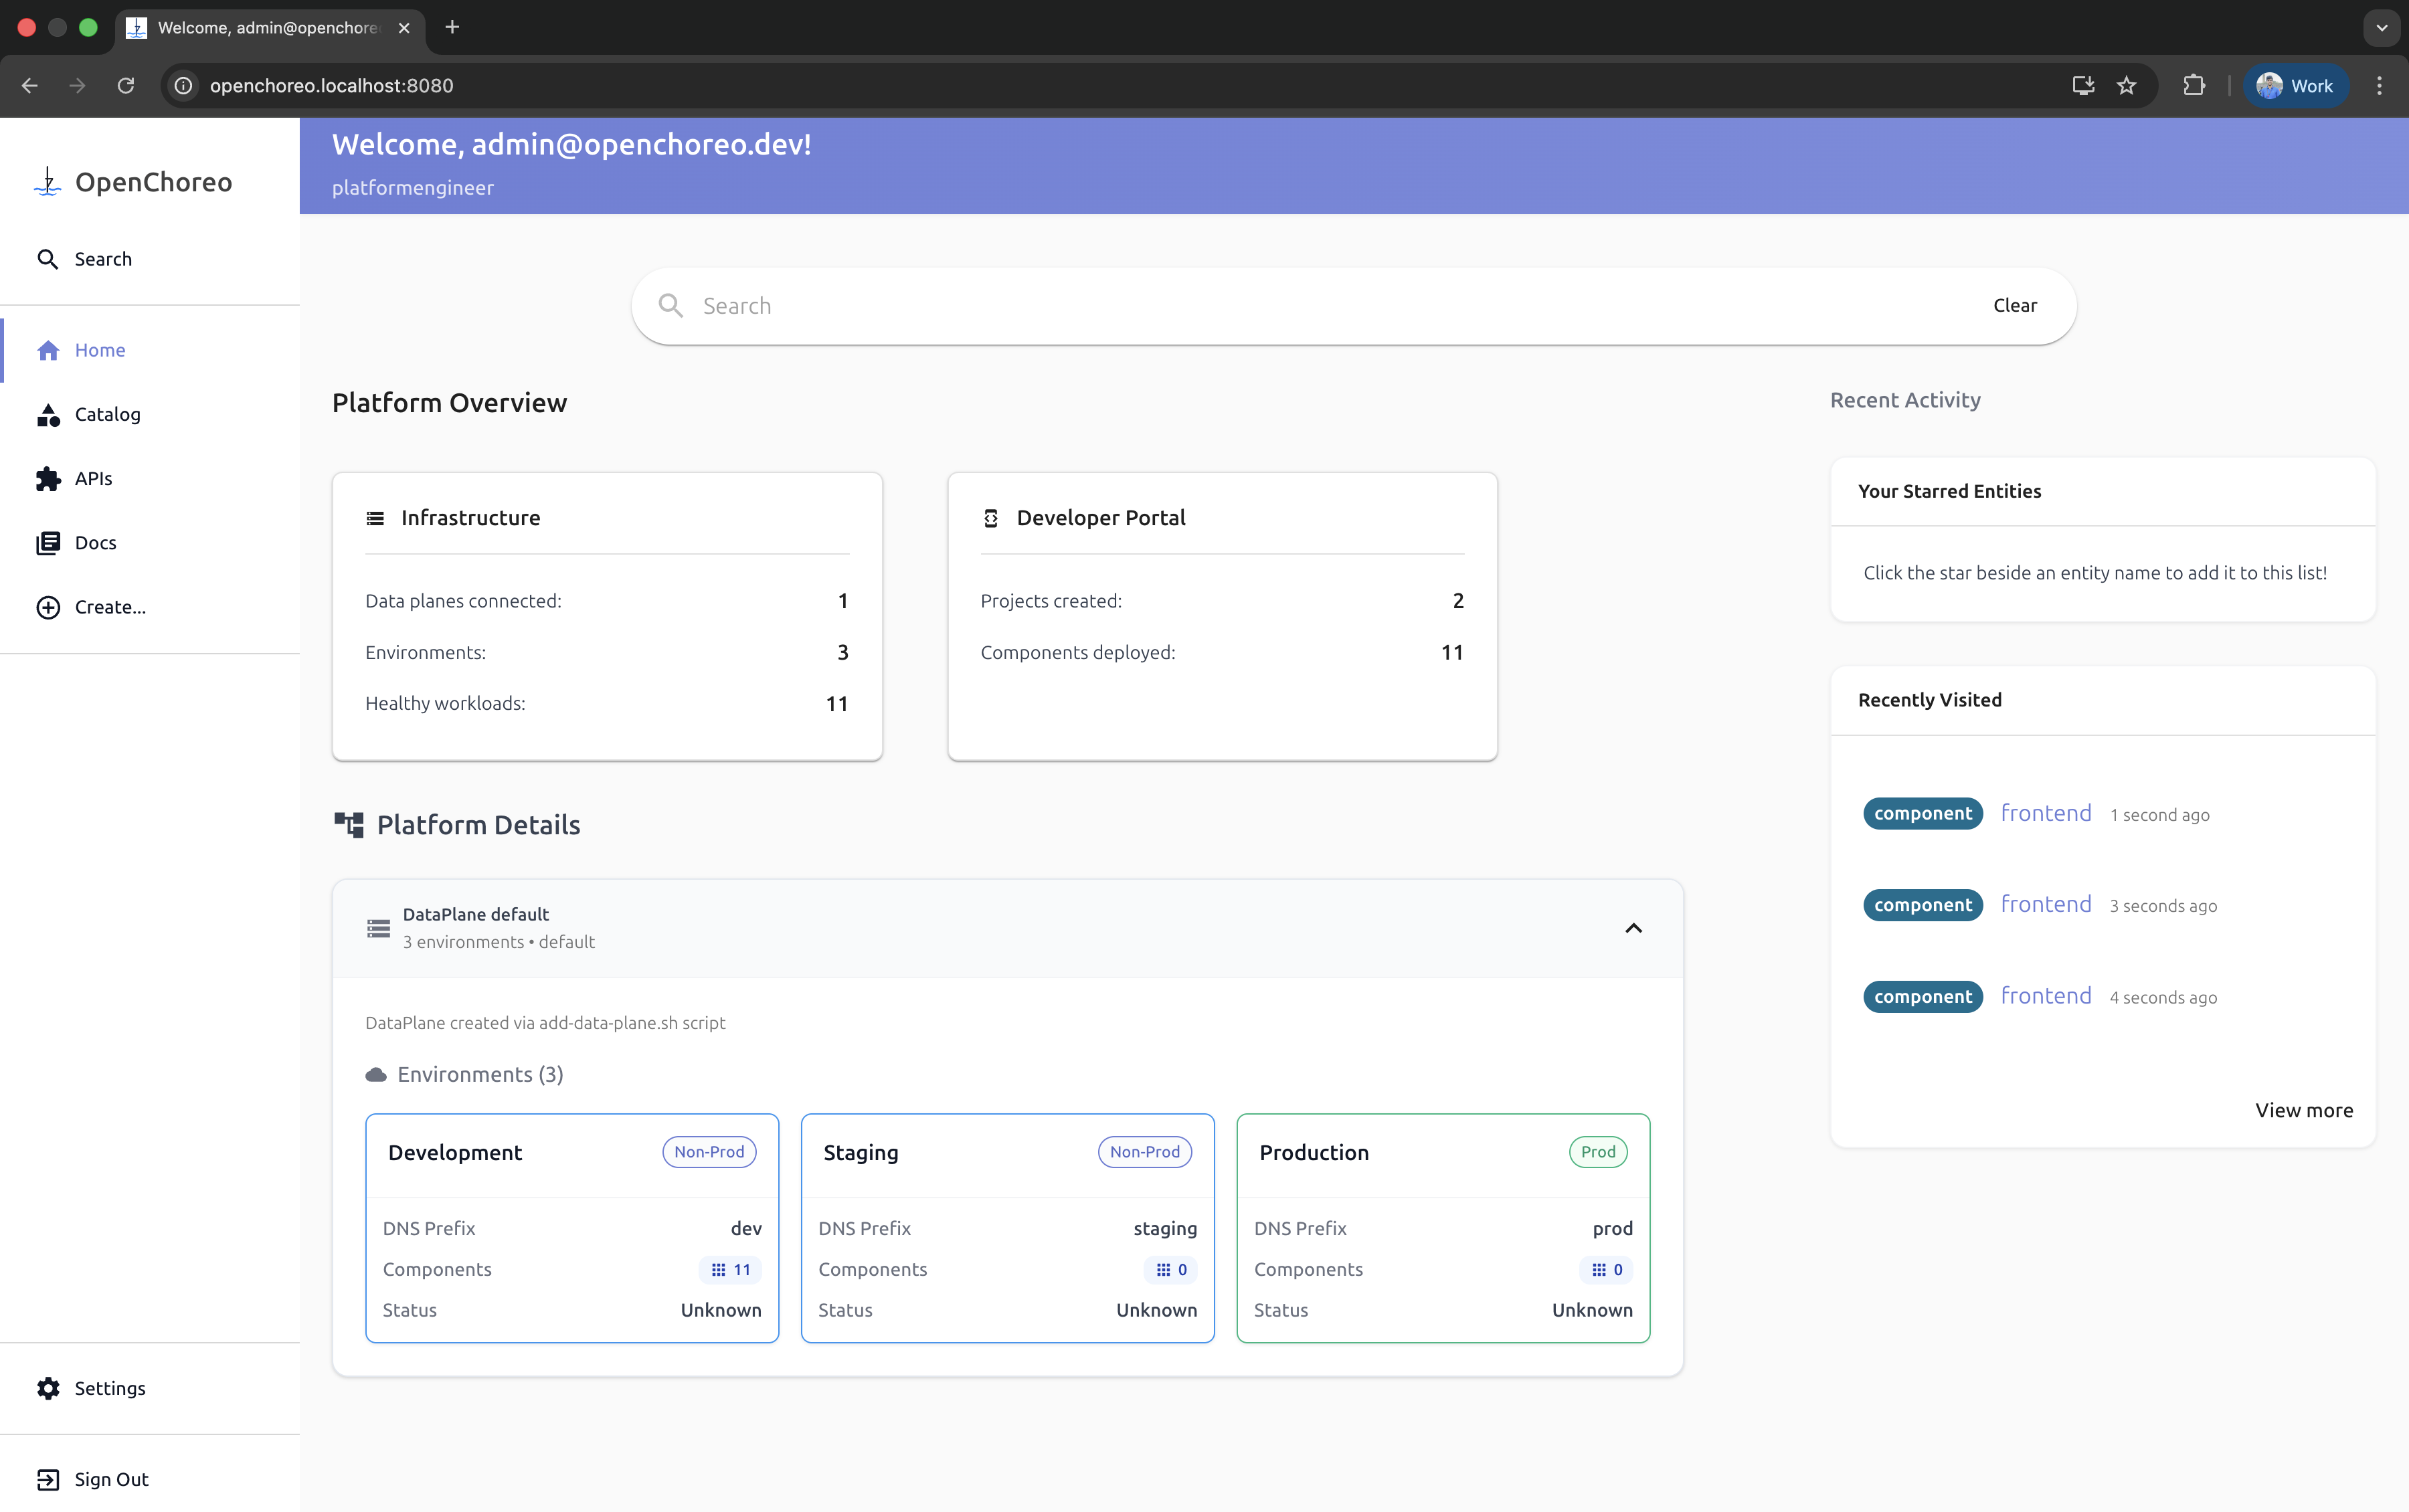
Take some time to explore the interface where you can:
- View your deployed components
- Monitor application status
- Access component catalogs
- Manage deployment pipelines
To access advanced features like CI/CD pipelines (Workflow Plane) and Observability (Observability Plane) within the UI, you can enable them by including the following flags during installation:
./install.sh --version v1.0.0 --with-build --with-observability
Understanding the Setup
Running the installation and deployment commands initializes OpenChoreo locally and deploys a sample web application. The following sections describe what occurs behind the scenes.
1. The Install Command
The installation process:
- Initializes a Dev Container with all required tools.
- Creates a k3d (k3s-in-Docker) cluster in Docker.
- Installs the OpenChoreo IDP and dependencies using Helm charts.
Foundation Resources Created
The installation automatically provisions the following OpenChoreo abstractions:
- Namespace (Kubernetes namespace labeled with
openchoreo.dev/control-plane: true) - Cluster Data Plane
- Cluster Workflow Plane (only when installed with
--with-build) - Environments (e.g., Development, Staging, Production)
- Deployment Pipeline
- Project
- Cluster Component Types (e.g., service, web-application, scheduled-task)
- Cluster Workflows (only when installed with
--with-build) - Cluster Traits (e.g., observability-alert-rule)
Cluster-scoped resources like these are automatically visible to all namespaces, so additional namespaces can start deploying without any extra setup. Namespace-scoped variants are available if you need to customize or isolate resources for a specific namespace.
View these resources using the following commands:
kubectl get namespaces -l openchoreo.dev/control-plane=true
kubectl get clusterdataplanes
kubectl get environments
kubectl get projects
kubectl get clustercomponenttypes
View details for a specific resource:
kubectl get project default -oyaml
2. Deploy Command
The deployment script creates:
- A sample Web Application Component
- The corresponding Deployment resource
List deployed components:
kubectl get components
3. UI Architecture
The Backstage UI is powered by the OpenChoreo Backstage plugin, providing a unified interface for managing your components and deployments. The authentication and user management is handled by Thunder, a lightweight identity management platform that secures access to your OpenChoreo environment.
Explore more examples in the Samples directory or in
/samples inside the Dev Container.
When running samples in the Dev Container, you don't need to expose the OpenChoreo Gateway manually; it's already available on port 19080 (HTTP) and port 19443 (HTTPS) of the host machine.
Explore More
After deploying your first application, try these additional examples to explore more of OpenChoreo's capabilities:
GCP Microservices Demo
Deploy a complete microservices application with 11 services (frontend, cart, checkout, payment, etc.):
./deploy-gcp-demo.sh
This demonstrates how OpenChoreo handles multi-service applications and service-to-service communication.
Build and Deploy from Source
Experience the full development workflow by building a container image from source code and deploying it:
./build-deploy-greeter.sh
This example requires the Workflow Plane. If you didn't install it initially, reinstall with:
./install.sh --version v1.0.0 --with-build
This demonstrates:
- Building container images from source
- Storing images in the integrated container registry
- Deploying the built image to the Data Plane
Understand What OpenChoreo Created
Want to understand the resources OpenChoreo created behind the scenes? Follow the Deploy and Explore guide to walk through the full resource chain.
After completing your work, choose one of the following options:
- Exit and return later: Exit the Dev Container to resume work later:
exit
- Full cleanup: Remove all resources and restore a clean environment:
./uninstall.sh
exit
This completes the setup and teardown process for OpenChoreo.
Troubleshooting
Docker Resource Constraints
If installation fails, confirm Docker has sufficient resources:
docker run --rm alpine:latest sh -c "echo 'Memory:'; free -h; echo; echo 'CPU Cores:'; nproc"
Ensure at least 4 GB RAM and 2 CPU cores are allocated (or 8 GB RAM and 4 CPU cores if using WorkflowPlane).
You have now set up OpenChoreo locally using a preconfigured environment, deployed a sample web application, and learned how to inspect, manage, and clean up the setup. This environment serves as a reproducible baseline for testing and evaluating OpenChoreo components and workflows.